When counseling patients on peptide injections, focus on safe techniques, proper reconstitution, and effective storage to minimize risks and ensure treatment success. Here’s what you need to know:
- Injection Technique: Subcutaneous injections are common for peptides like BPC-157 and CJC-1295. Teach patients to clean the skin with alcohol, inject at the correct angle (45° for lean individuals, 90° for others), and rotate injection sites to avoid tissue damage.
- Reconstitution: Use bacteriostatic water for multi-dose vials to prevent bacterial growth. Add water gently along the vial's wall to protect the peptide structure. Avoid shaking; swirl instead.
- Storage: Keep reconstituted peptides refrigerated (36–46°F). Label vials with the reconstitution date and discard them according to stability guidelines (usually within 28–30 days for BAC water).
- Safety Tips: Use fresh needles for each injection, dispose of sharps in FDA-approved containers, and monitor for signs of complications like redness, swelling, or fever.
Patients should log injection details (site, dose, date) and seek medical attention for severe or prolonged side effects. Proper guidance improves safety, reduces errors, and enhances treatment outcomes.
Doctor Explains How To CORRECTLY Prepare And Inject Your Peptides (not what you think)
sbb-itb-7164bd9
Review the Patient's Prescription and Injection Plan
Before proceeding with injections, it's crucial to ensure that patients have a clear understanding of their prescription details. As Dr. Jossy Onwude, MD, explains:
"Dosing errors in peptide injection most commonly stem from one source: confusing milliliters with units on an insulin syringe."
Key Prescription Details to Address
Start by reviewing the essentials with the patient: the type of peptide (such as BPC-157 or Ipamorelin/CJC-1295), the concentration (measured in mcg/mL), the administration route, and the frequency of dosing. Most therapeutic peptides require subcutaneous injections into fatty tissue, but there are exceptions like Selank or Semax, which are administered intranasally.
One common challenge for patients is converting their prescribed dose in micrograms (mcg) into units on an insulin syringe. This calculation is straightforward and can be explained as follows:
Dose Volume (mL) = Desired Dose (mcg) ÷ Concentration (mcg/mL)
On a U-100 insulin syringe, 1 unit equals precisely 0.01 mL. Walk the patient through this calculation using their specific prescription to ensure they understand.
Once the dosing math is clear, move on to proper needle selection and discuss reconstitution procedures to maintain the medication's effectiveness.
Reconstitution and Expiration Guidelines
After confirming the prescription details, guide patients on how to safely reconstitute their peptide. Since peptides are typically supplied in a lyophilized (freeze-dried) form, they need to be dissolved before use. The solvent choice is critical: bacteriostatic water (BAC), containing 0.9% benzyl alcohol, is the preferred option for multi-dose vials because it prevents bacterial growth for up to 28 days after the first puncture. In contrast, plain sterile water should only be used for single-use preparations, as multi-dose use increases contamination risks.
Proper technique during reconstitution is essential. Direct the BAC water along the inner wall of the vial to avoid damaging the peptide. As noted in the FormBlends Research Report:
"Direct force from a water stream can physically damage the peptide structure, cause excessive foaming, and lead to denaturation."
After adding the water, gently swirl or roll the vial between your palms instead of shaking it. If the solution becomes cloudy, yellow, or contains particles, it should be discarded immediately.
Finally, instruct patients to label each vial right after reconstitution. Include the reconstitution date, the calculated concentration (e.g., "250 mcg per 10 units"), and the discard-by date, which should align with the pharmacy's beyond-use date. Unreconstituted peptides stored at 2–8°C (36–46°F) can remain stable for 12–24 months, but once reconstituted, most are stable for 28–90 days under refrigeration, depending on the compound.
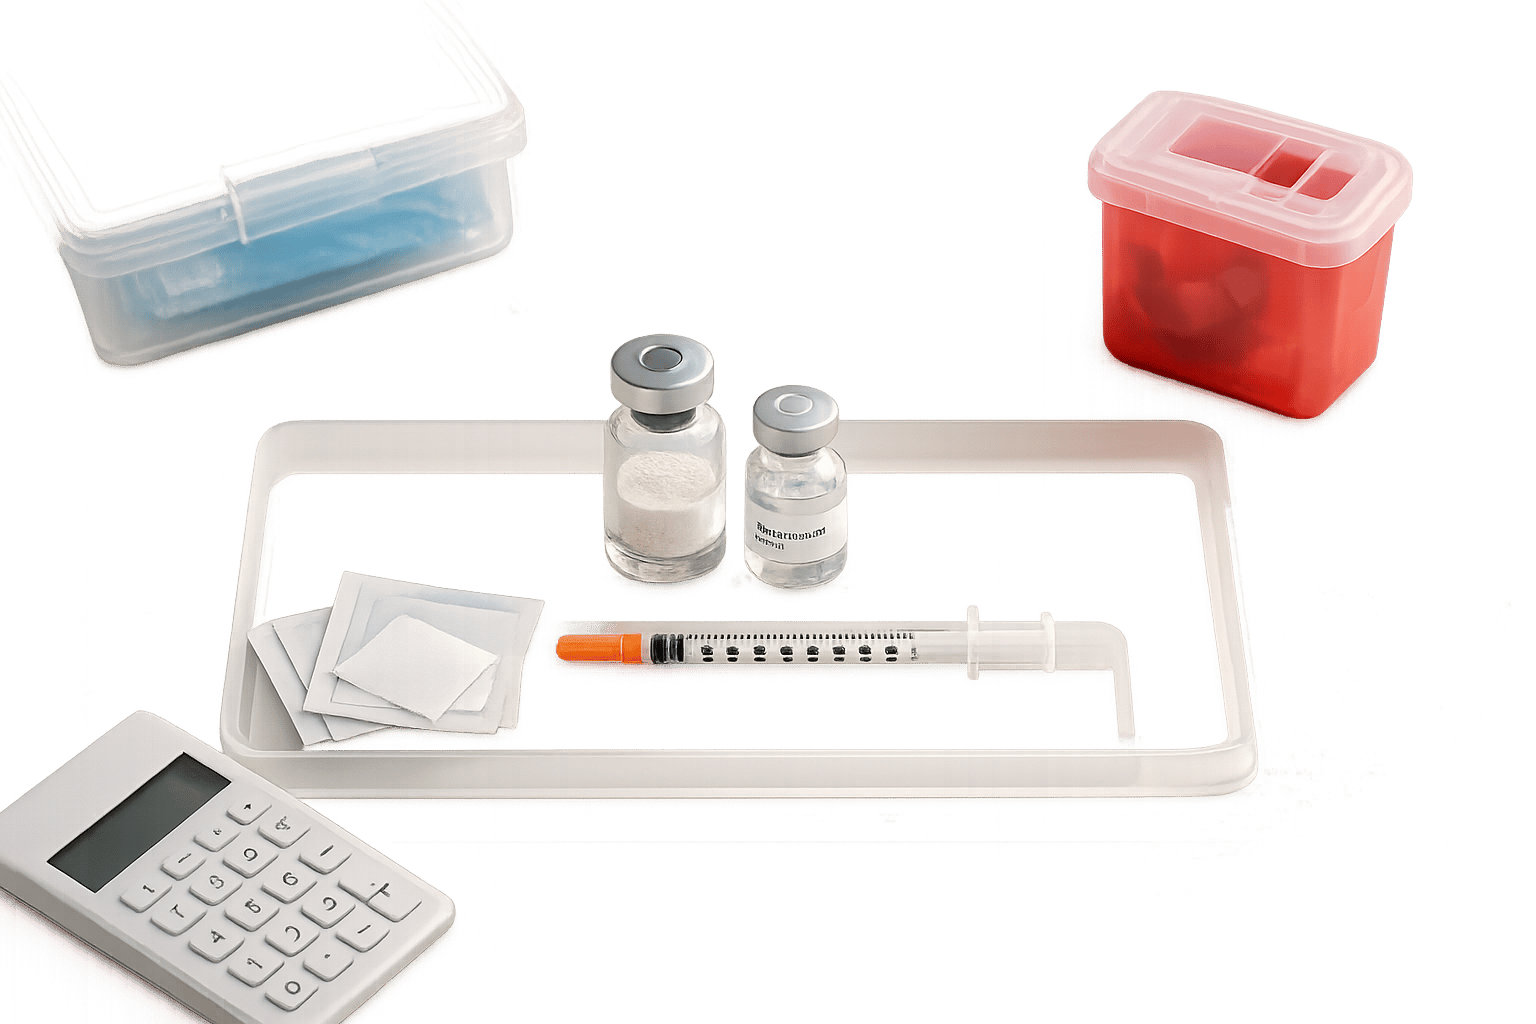
Prepare the Medication and Supplies
After carefully reviewing the prescription and reconstitution instructions, it's time to get the medication and supplies ready. To ensure everything is accurate and safe, organize all the supplies on a clean, flat surface before starting the injection. Having everything prepared in advance helps avoid contamination.
What Supplies to Gather
Before beginning, make sure all necessary items are within reach. Use a surface wiped with 70% isopropyl alcohol and allow it to air-dry completely.
| Supply Item | Specification |
|---|---|
| Insulin Syringe | U-100, 29–31 gauge, 0.3–1 mL |
| Bacteriostatic Water (BAC) | 0.9% benzyl alcohol; for multi-dose use |
| Alcohol Swabs | 70% isopropyl; for vial tops and skin |
| Sharps Container | FDA-compliant, puncture-resistant with locking lid |
| Sterile Gauze | For light pressure after injection |
| Mixing Syringe (optional) | 21–25 gauge; makes drawing BAC water easier |
Start by practicing proper hand hygiene. Dr. Jossy Onwude, MD, stresses this point:
"Wash your hands thoroughly. Twenty seconds, soap and water, dried with a clean towel. This is the single most effective infection-prevention measure and should never be abbreviated."
Washing hands properly reduces contamination risk by 85%. Once your hands are clean, use an alcohol swab to disinfect the rubber septum of both the peptide vial and the BAC water vial. Let each air-dry for 10–15 seconds before inserting a needle.
With all supplies ready and your hands clean, you're set to prepare the peptide solution.
How to Prepare the Peptide Solution
If the peptide hasn’t been reconstituted yet, follow the reconstitution steps described earlier. If it has, inspect the solution's clarity before proceeding. Hold the vial up to a light source and carefully check the liquid. The solution should appear clear and colorless. If you notice cloudiness, visible particles, or discoloration, discard the vial immediately.
Verifying the Dose Before Injection
After reviewing the dose calculations, confirm the exact amount needed before injecting. Use the following formula to determine how many units to draw:
Units to Draw = (Desired Dose in mcg ÷ Total Peptide in mcg) × Total BAC Water in Units
For example, with a 5 mg vial reconstituted with 2 mL (200 units), you would draw 10 units for a 250 mcg dose. It's important to guide patients through their specific calculations to build confidence in the process.
Once the dose is drawn, tap the syringe lightly to move any air bubbles to the top and expel them. If the solution has been stored in the refrigerator, allow the filled syringe to sit at room temperature for 5–10 minutes before injecting. This reduces the stinging sensation caused by cold injections. Lastly, if the needle tip touches any surface, discard the syringe and use a new one. Reusing a needle, even once, can triple injection discomfort due to microscopic dulling of the tip.
Choose and Rotate Injection Sites
Once you've confirmed the correct dose, the next step is deciding where to inject. For most peptide therapies, subcutaneous (SQ) injections are the preferred method. Dr. James Okafor, PharmD, explains why:
"The vast majority of clinical peptide protocols use subcutaneous injection... SC injection is associated with slower absorption, less pain, and a lower risk of inadvertent vascular puncture compared to IM."
The goal is to inject into the subcutaneous fat layer, not the muscle. Choosing the right site helps ensure consistent absorption and minimizes discomfort.
Common Subcutaneous Injection Sites
The abdomen is the most commonly recommended site, thanks to its consistent fat layer and easy accessibility. Be sure to inject at least 2 inches away from the navel to avoid sensitive areas and ensure proper absorption.
The outer thigh (specifically, the middle third between the hip and knee) is another good option. It's easy to see during self-injection and provides sufficient subcutaneous fat, though it might be slightly more sensitive than the abdomen. The upper outer arm can also work, but it’s harder to reach without help. Other potential sites include the flanks (love handles) and the upper outer gluteal area, both of which have adequate fat but may be tricky to access on your own.
For proper subcutaneous delivery, look for areas with 1–2 inches of pinchable fat. Avoid injecting into spots that are bruised, scarred, inflamed, or hardened.
| Injection Site | Ease of Self-Injection | Key Consideration |
|---|---|---|
| Abdomen | Excellent | Stay 2 inches from the navel; consistent absorption |
| Outer Thigh | Good | Easily visualized; may be slightly more sensitive |
| Upper Outer Arm | Challenging without assistance | Typically requires help |
| Flanks / Glutes | Moderate | Adequate fat depth; harder to access |
How to Rotate Injection Sites
Rotating injection sites is crucial to avoid complications like lipohypertrophy. This condition, as explained by Dr. Jossy Onwude, MD, involves the development of fibrous, fatty lumps caused by repeated injections in the same area:
"Site rotation is non-negotiable. Injecting repeatedly into the same small area causes lipohypertrophy - a fibrous, fatty lump that develops from chronic local tissue trauma."
These lumps not only disrupt the skin but also create a "depot effect", where medication absorption becomes unpredictable. This can lead to dose inconsistencies and reduced effectiveness.
A simple rotation strategy is the quadrant method: divide the abdomen into four sections and rotate clockwise. Stick to one quadrant for about a week, ensuring each new injection point is at least 1 inch away from the last. To stay organized, patients can use an injection log to track the date, time, and site of each injection. This helps ensure proper rotation and allows for monitoring any local reactions.
Teach the Injection Technique
Peptide Injection Step-by-Step Guide for Patients
Helping patients understand the injection process with clear, step-by-step guidance can ease concerns and build confidence, particularly for those attempting self-injections for the first time.
Step-by-Step Injection Instructions
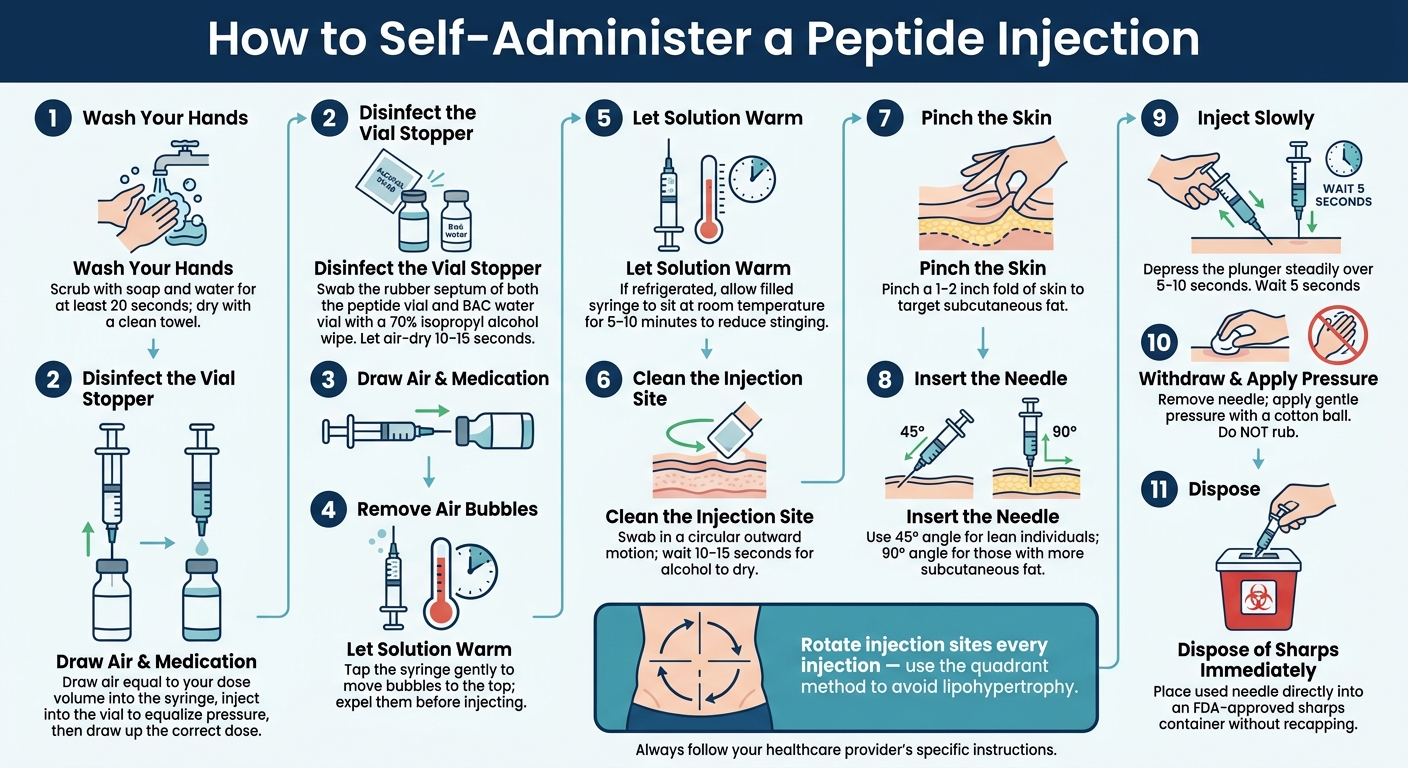
Start by instructing patients to wash their hands thoroughly for at least 20 seconds. Next, they should swab the vial's rubber stopper with a 70% isopropyl alcohol wipe and allow it to air-dry completely.
Once the vial is ready, have patients draw air into the syringe equal to the intended dose volume. They should inject this air into the vial to balance the internal pressure. After drawing up the medication, remind them to gently tap the syringe to move air bubbles to the top and expel any bubbles before proceeding.
Before injecting, patients should clean the injection site using an alcohol swab in a circular motion, starting at the center and moving outward. They should wait 10–15 seconds for the alcohol to dry. For the injection itself, advise them to pinch a 1–2 inch fold of skin to target the fatty tissue. Instruct lean patients to insert the needle at a 45° angle, while those with more subcutaneous fat can use a 90° angle. Once the needle is positioned, they should depress the plunger slowly and steadily over 5–10 seconds. After the dose is delivered, they should wait about 5 seconds before withdrawing the needle. If needed, applying gentle pressure with a cotton ball can help.
"Do not rub [the injection site] - this can disperse the compound and increase bruising." - Dr. James Okafor, PharmD
Finally, go over additional strategies to minimize any discomfort during the process.
Tips for Reducing Discomfort
Even small adjustments can make injections more comfortable. For patients who are particularly nervous or sensitive, suggest applying an ice pack to the injection site for about 30 seconds before cleaning it.
Choosing the right needle is also key. A 31G needle is known to cause minimal tissue disruption, making subcutaneous injections less painful. Reusing needles, however, should be avoided at all costs. Repeated use can dull the needle tip and create tiny barbs, which may increase discomfort by up to three times. Using a new needle for every injection ensures both safety and a more comfortable experience. These simple measures can make a big difference in ensuring safe and stress-free peptide injections.
Cover Safety, Storage, and Disposal
After administering an injection, it’s essential to focus on proper disposal, safe storage, and monitoring for potential complications. Post-injection care plays a key role in ensuring patient safety.
How to Dispose of Sharps Safely
Once the injection is complete, proper sharps disposal is a must. Immediately place the used needle into an FDA-approved sharps container without recapping it. Recapping is a leading cause of needle stick injuries. If you don’t have an approved container, a heavy-duty plastic alternative, like an empty laundry detergent bottle with a secure lid, can be used temporarily - just make sure it complies with local regulations. Only fill the container up to 75% of its capacity. When it’s full, take it to a pharmacy or medical facility for disposal. These services typically cost between $5 and $15.
With sharps safely handled, attention should shift to storing reconstituted peptides properly to maintain their effectiveness.
How to Store Reconstituted Peptides
Reconstituted peptides need to be kept refrigerated at 36°F to 46°F (2°C to 8°C). Store them in the main section of the refrigerator, not the door, as temperature fluctuations are more common there. It’s also crucial to protect peptides from light and avoid unnecessary physical agitation.
"Vigorous shaking can denature the peptide by breaking its molecular bonds." - Editorial Staff, GLP1 Journal
Instead of shaking, gently swirl the vial to mix its contents. Never freeze reconstituted peptides, as ice crystals can damage their molecular structure and even crack the vial. The stability of peptides depends on the solvent used: those mixed with bacteriostatic water can remain stable for 28–30 days, while those reconstituted with plain sterile water should be used within 24–48 hours. To stay organized, label each vial with the reconstitution date and expiration date immediately after mixing. Before every injection, inspect the solution for cloudiness, unusual particles, or color changes - these could signal degradation.
Finally, monitoring for any signs of complications ensures timely action if any issues arise.
Signs of Complications to Watch For
Most patients experience mild and temporary reactions, such as slight redness, a small bump, or brief stinging, which usually subside within an hour. However, some symptoms may require medical attention. The table below outlines typical reactions versus those that might indicate a problem:
| Reaction Type | Symptoms | Action |
|---|---|---|
| Normal | Slight redness (<1 hr), minor bruising, small wheal, brief stinging | No action needed; continue rotating injection sites |
| Concerning (Local) | Redness spreading beyond 5 cm, increasing warmth, pus, swelling worsening after 24 hrs | Contact a healthcare provider |
| Concerning (Systemic) | Fever above 101.3°F, chills, red streaking from the site, severe abdominal pain | Seek prompt medical evaluation |
| Emergency | Hives, throat swelling, difficulty breathing, facial swelling | Call 911 immediately |
Patients should keep a log of each injection, noting the date, time, dose, and site. This helps track patterns in local reactions. If a firm lump persists and grows beyond 72 hours, it’s time to consult a healthcare provider. Repeated injections in the same area can lead to lipohypertrophy, a buildup of hardened fatty tissue, which may interfere with drug absorption and lead to inconsistent results.
Conclusion: Better Counseling Leads to Better Patient Outcomes
This guide highlights how proper technique and regular follow-up are essential for safe and effective peptide therapy. Every step - whether it's reviewing the prescription, preparing the solution, rotating injection sites, or spotting complications - ties back to one key takeaway: when patients understand the process, they are safer and more likely to stick with their treatment.
The numbers speak for themselves. Using correct techniques can keep infection rates below 0.5%, while errors can increase complications by up to 15 times. Similarly, regular site rotation can limit lipohypertrophy to under 2%, compared to as high as 25% in patients who inject in the same area repeatedly. These differences aren't just statistics - they directly influence how well the therapy works.
Counseling doesn’t stop after the first session. As Dr. Stephen Cosentino, DO, CEO of Empire Medical Training, explains: "Monitoring ensures dose adjustments and early detection of side effects." Scheduling follow-ups - at two weeks for initial questions and at four to six weeks to review progress - gives patients the chance to address small issues before they escalate. These check-ins also reinforce best practices, like handling vials gently, inspecting doses visually, and maintaining an injection log.
When clinicians communicate clearly and consistently, they help build patient confidence and encourage adherence. That’s how a well-written prescription transforms into a successful treatment plan. By mastering these techniques, healthcare providers can ensure better outcomes and stronger patient trust.
FAQs
How do I convert mcg doses to insulin syringe units?
To figure out how many units to use on an insulin syringe for a dose in micrograms (mcg), follow these steps:
-
Calculate the dose volume in milliliters (mL) using this formula:
Dose volume (mL) = Target dose (mcg) ÷ Concentration (mcg/mL) -
Convert the volume into syringe units with this formula:
Syringe units = Dose volume (mL) × 100
Here’s an example: If the target dose is 250 mcg and the concentration is 2,500 mcg/mL, the dose volume is 0.1 mL. Multiply that by 100, and you’ll get 10 units on a U-100 insulin syringe.
What should I do if my reconstituted peptide looks cloudy or discolored?
If your reconstituted peptide looks cloudy, has an unusual color, or contains visible particles, do not use it - discard it right away. A proper solution should appear clear, colorless, or have a very light yellow tint. Any cloudiness, discoloration, or particles could signal contamination, degradation, or denaturation, which makes the solution unsafe.
How can I prevent lumps and bruising from repeated injections?
To prevent lumps and bruising, it's important to rotate injection sites in an organized way. You can divide the abdomen into sections or switch sides, ensuring injections are spaced at least 1 inch (2.5 cm) apart. Avoid areas with bruised or irritated skin. After removing the needle, gently press the area with a clean cotton ball - don’t rub. Rotating sites and handling the skin gently can improve absorption and minimize tissue damage.