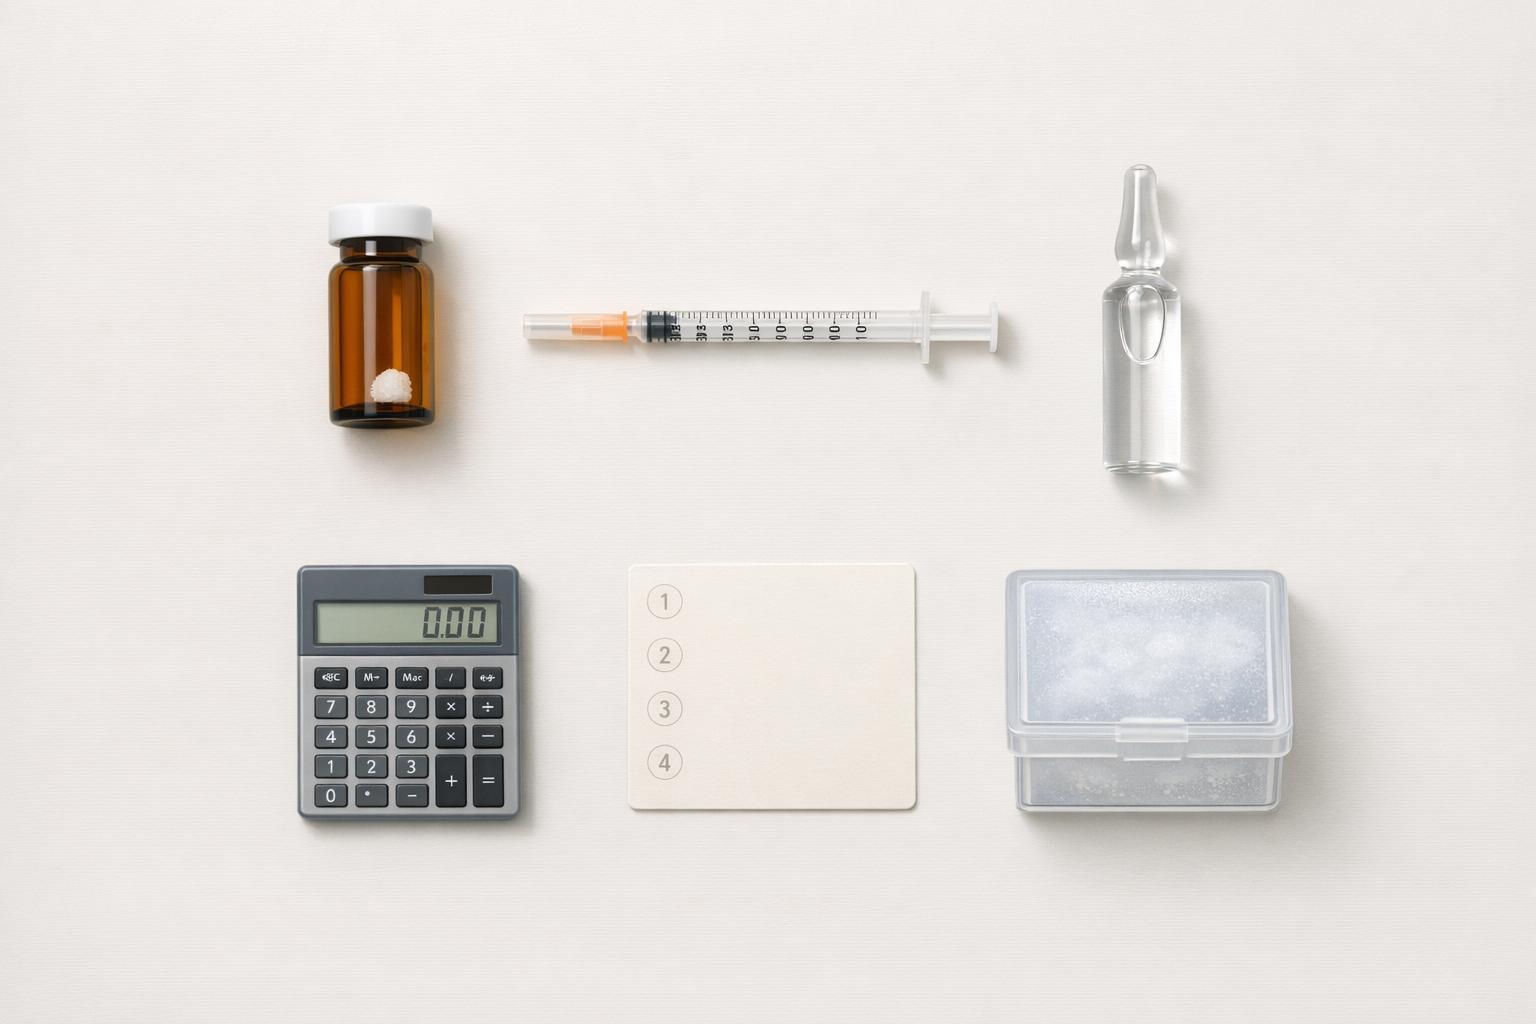
Peptide reconstitution errors can lead to serious issues like incorrect dosing, contamination, or peptide degradation. Here's what you need to know to avoid common mistakes and ensure safe, accurate preparation:
- Planning Mistakes: Miscalculating doses, confusing units (mg vs. mcg), or using the wrong solvent can cause significant errors. For example, a small decimal error could result in a 1,000x dosing mistake.
- Technique Errors: Forceful solvent injection, skipping sterilization steps, or shaking the vial can damage peptides or introduce contaminants.
- Storage Issues: Improper refrigeration, freezing, or using peptides past their stability window reduces effectiveness and can pose safety risks.
- Documentation Gaps: Missing labels or incomplete logs lead to dosing errors and uncertainty about stability or safety.
To prevent these problems:
- Use tools like reconstitution calculators for accurate measurements.
- Follow proper sterile techniques during preparation.
- Store reconstituted peptides correctly (refrigerated, shielded from light, and upright).
- Label vials immediately with key information like concentration, reconstitution date, and expiration.
Mistakes are avoidable with clear workflows, regular staff training, and reliable tools. Keep reading for detailed solutions to common errors and practical tips for safe peptide handling.
Doctor Explains How To CORRECTLY Prepare And Inject Your Peptides (not what you think)
Planning Errors in Peptide Reconstitution
Reconstitution errors often stem from mistakes made during the planning phase. Missteps like incorrect volume calculations, choosing the wrong solvent, or overlooking pH requirements can create problems that even perfect execution later on cannot resolve. These errors set the stage for technical mishaps and storage complications down the line.
Miscalculating Concentration and Volume – A Common Planning Error
One of the most frequent and dangerous mistakes involves confusing milligrams (mg) with micrograms (mcg). Since 1 mg equals 1,000 mcg, a small decimal error can lead to a 1,000-fold dosing mistake. This issue is a recurring problem in peptide handling.
"Peptide calculation errors are the single most common reason research results become unreliable, and most mistakes happen not because the formulas are complicated - but because beginners misunderstand the units, skip a step, or confuse two similar-sounding measurements." - Prax Peptides
Another common misstep involves misreading insulin syringe markings. For instance, "10 units" on a U-100 syringe equals 0.1 mL. Misreading this can result in drawing 100 times the intended dose. Even a small error of ±0.5 units can lead to a 25% discrepancy at 2 units, compared to just 5% at 10 units.
"The accuracy of a typical insulin syringe is approximately plus or minus 0.5 units - at 2 units, this represents 25% error; at 10 units, it represents only 5% error." - PeptaHub Editorial Team
The solution? Work backward from the desired dose. Select a volume of bacteriostatic water (BAC water) that allows for easy-to-read syringe markings. For example, adding 2 mL of BAC water to a 5 mg vial creates a concentration of 2,500 mcg/mL, where each unit on a U-100 syringe equals 25 mcg. Tools like PeptidePrescriber's free reconstitution calculator can simplify these calculations and help avoid confusion.
| Peptide Vial Size | BAC Water Added | Concentration (mcg/mL) | Amount per U-100 Syringe Unit |
|---|---|---|---|
| 5 mg | 1 mL | 5,000 | 50 mcg |
| 5 mg | 2 mL | 2,500 | 25 mcg |
| 10 mg | 2 mL | 5,000 | 50 mcg |
| 10 mg | 5 mL | 2,000 | 20 mcg |
| 30 mg | 3 mL | 10,000 | 100 mcg |
Besides calculation errors, selecting the wrong solvent can also lead to reconstitution problems.
Choosing the Wrong Solvent – A Common Planning Error
The solvent you choose plays a critical role in ensuring the peptide dissolves fully and remains stable. For instance, using plain sterile water for a multi-dose vial leaves the solution vulnerable to bacterial growth, which can degrade the peptide and produce harmful endotoxins. On the other hand, bacteriostatic water, which contains 0.9% benzyl alcohol, inhibits microbial growth and typically preserves the peptide for up to 28 days when refrigerated.
The peptide's properties, such as charge and hydrophobicity, also dictate the ideal solvent. For example:
- Basic peptides (net positive charge): Dissolve better in mildly acidic solutions like 0.1% acetic acid.
- Acidic peptides (net negative charge): Require slightly basic solutions like 0.1% ammonium hydroxide.
- Highly hydrophobic peptides: Often need a small amount of DMSO or DMF for initial dissolution, followed by gradual dilution with an aqueous solvent to keep the organic concentration below 1%.
One critical rule: never use tap water, bottled water, or grocery-store distilled water. These are not sterile and can introduce contaminants that compromise both the peptide and user safety.
Ignoring Stability and pH Requirements – A Common Planning Error
After selecting the right solvent, it's vital to account for the peptide's stability. Each peptide has an isoelectric point (pI) - the pH at which it has no net charge. At or near this pH, peptides are more likely to aggregate or precipitate due to reduced electrostatic repulsion. Ignoring this can lead to clumping during reconstitution.
The solvent's pH also affects chemical stability. Using an inappropriate pH can trigger degradation processes like hydrolysis, oxidation, or deamidation, which are often irreversible. Additionally, purity-adjusted dosing is crucial. A 5 mg vial with 95% purity actually contains only 4.75 mg of active peptide, and failing to adjust for this can result in dosing errors. A practical approach is to document the manufacturer’s recommended pH range and solvent type in your clinic’s standard operating procedures to avoid such issues.
Technique Errors During Reconstitution
Even with careful planning, errors during the actual reconstitution process can affect peptide integrity just as much as calculation mistakes. The most common issues - contamination, forceful solvent injection, and excessive mixing - are entirely avoidable with proper technique. Below, we’ll explore how these hands-on missteps during solvent addition and mixing can compromise peptide quality.
Contamination and Loss of Sterility
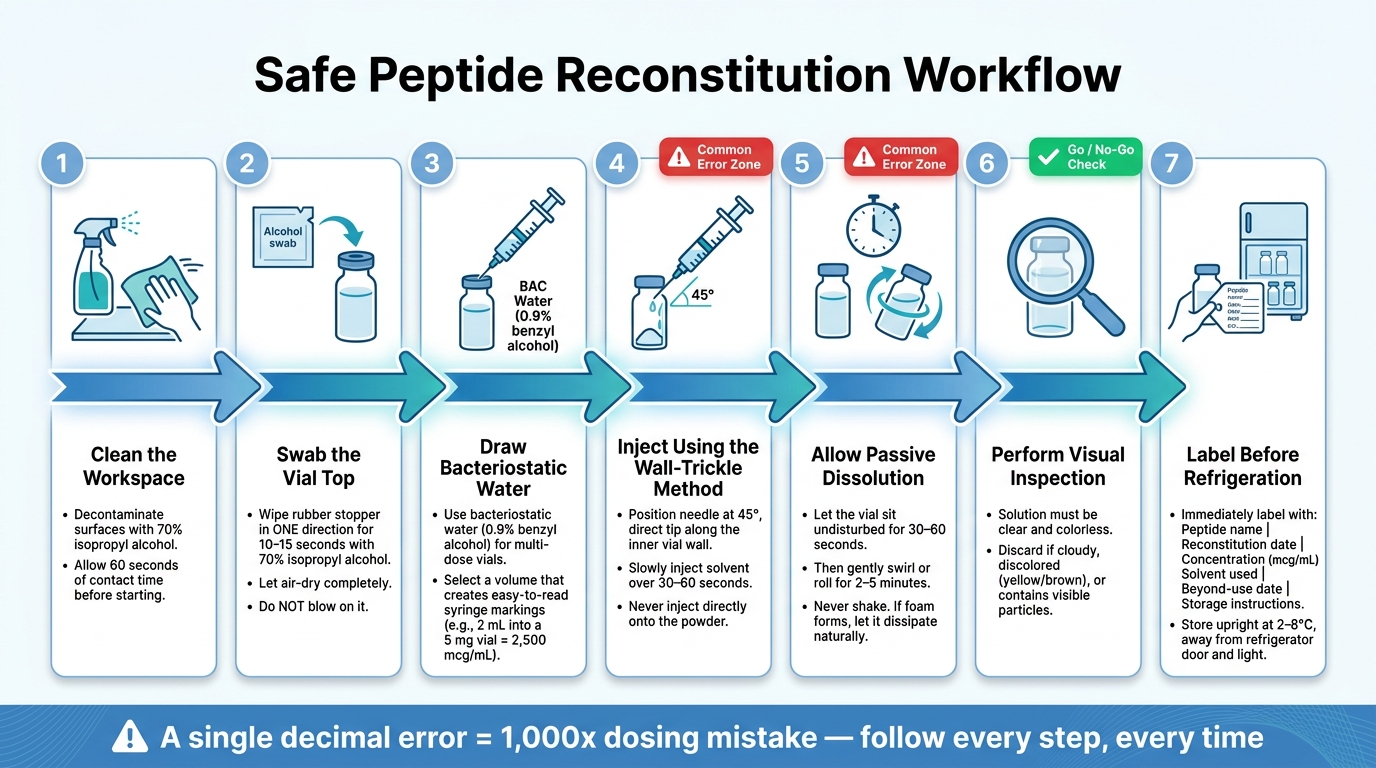
Maintaining sterility can be trickier than it seems. Skipping simple steps like swabbing the vial septum with alcohol, letting a needle touch a non-sterile surface, or working in a drafty area can introduce contaminants. To prevent this, always wipe the rubber stopper in one direction for 10–15 seconds using 70% isopropyl alcohol, and let it air-dry completely - don’t blow on it. Additionally, prep your workspace by decontaminating surfaces with 70% isopropyl alcohol, ensuring at least 60 seconds of contact time before starting.
When inserting the needle, a slight angle helps reduce "coring", where tiny rubber fragments from the stopper end up in the solution. If you suspect particulates, a 0.22-micron sterile PES or PVDF syringe filter can help remove them. Once sterility is ensured, the next critical step is how you add the solvent.
Incorrect Solvent Injection
The way you introduce solvent matters just as much as the solvent itself. Injecting liquid forcefully onto the lyophilized powder can compress the material into clumps, create foam, and damage peptides. Foam, in particular, exposes peptides to air-liquid interfaces, which can denature delicate residues like methionine, cysteine, or tryptophan.
To avoid this, position the needle at a 45° angle and direct the tip along the inner wall of the vial. Slowly inject the solvent over 30–60 seconds, allowing it to flow gently down the glass instead of hitting the powder directly. Following these steps can significantly reduce the risk of damaging the peptides during reconstitution.
Excessive Mixing and Agitation
Once the solvent is added, shaking the vial vigorously might seem like a quick way to mix, but it’s a common mistake. This creates bubbles and increases the air-water interface, which can lead to peptide unfolding and aggregation. Even if the solution looks clear, its peptide content may be compromised.
Instead, let the vial sit undisturbed for 30–60 seconds to allow the powder to absorb the solvent fully. Then, gently swirl or roll the vial for 2–5 minutes until the solution is uniform. If foam forms, resist the urge to mix again - let the vial sit until the foam dissipates naturally. A properly reconstituted peptide solution should be clear and colorless. Any cloudiness or visible particles indicate that the solution may be compromised and should be discarded.
These technique-related errors highlight how critical it is to follow standardized procedures at every step to ensure successful peptide reconstitution. Even small deviations can have a big impact on the final outcome.
Solubility and Stability Problems After Reconstitution
Even with careful planning and technique, challenges with solubility and stability can arise after reconstituting peptides. The most common issues - incomplete dissolution, precipitation, and aggregation - each have specific causes and solutions.
Incomplete Dissolution
If your peptide solution remains cloudy or forms a gel despite gentle swirling, it’s likely due to an unsuitable solvent, insufficient volume, or cold materials.
Peptides have a solubility limit. Reconstituting them at concentrations that exceed this limit can prevent complete dissolution. This is especially common with hydrophobic peptides, which contain amino acids like leucine, valine, or phenylalanine. These peptides often require a two-step process: dissolve them first in a small amount (50–100 µL) of DMSO or DMF, then gradually dilute with an aqueous solvent.
Temperature is another factor that’s easy to overlook. Using a cold diluent can lead to localized aggregation, causing cloudiness or gelation. To avoid this, let both the vial and solvent sit at room temperature for 15–20 minutes before reconstitution. If minor particulates persist despite correct technique, filtering the solution with a 0.22-micron low-protein-binding filter (PVDF or PES) can resolve the issue.
"If the solution has gelled, is cloudy, or contains visible particles, this indicates that the peptide has not been completely dissolved and may require a different solvent system or additional dissolution time." - The Chemical Record, 2024
Sometimes, dissolution is initially successful but problems emerge later.
Precipitation After Initial Dissolution
A peptide solution that looks clear right after reconstitution can still precipitate over time, especially with hydrophobic peptides like CJC-1295 or AOD-9604. These peptides may appear fully dissolved but can become cloudy or gel-like after being stored in the refrigerator for 1–2 days. This happens as solubility equilibrium shifts at lower temperatures.
Changes in pH are another common cause. Peptides are least soluble at their isoelectric point (pI) - the pH where they carry no net charge. If the pH drifts toward this point during storage, reduced electrostatic repulsion can lead to clumping. For basic peptides, adding 0.1%–1% acetic acid can lower the pH, restore the peptide’s charge, and dissolve the clumps. For acidic peptides, a small amount of diluted ammonium hydroxide works similarly.
If precipitation has already occurred, diluting the solution further can help. For gelled peptides, warming the vial in your hands and gently drawing the solution in and out of a fine-gauge syringe may restore uniformity.
Beyond visible precipitation, there’s another issue to watch for - aggregation.
Peptide Aggregation
Aggregation is harder to detect because it doesn’t always show visible signs. A solution might look clear, but the peptide’s biological activity could be compromised due to self-association. High concentrations increase the likelihood of peptide molecules colliding and aggregating.
The table below outlines common visual signals, their causes, and potential fixes:
| Visual Signal | Potential Cause | Recommended Fix |
|---|---|---|
| Immediate mild cloudiness | Cold solvent or slow hydration | Rest 10–15 min; gentle swirling |
| Stringy "gel" texture | High concentration; self-association | Increase solvent volume |
| Persistent particulates | Wrong pH or incomplete dissolution | Adjust pH away from isoelectric point |
| Microbubbles/Foam | Aggressive agitation | Let vial rest undisturbed to clarify |
| Discoloration (yellow/brown) | Oxidation or degradation | Discard the vial; do not use |
To distinguish microbubbles from true aggregation, let the vial sit undisturbed. If the cloudiness clears within a few minutes, it’s likely air from agitation. Persistent turbidity suggests a more serious issue.
"Vigorous shaking creates foam, introduces air bubbles, and generates shear forces that can denature the peptide chain - permanently altering its structure and rendering it useless for research." - CertaPeptides
To minimize aggregation, keep concentrations low, handle vials gently, and maintain the solution’s pH away from the peptide’s isoelectric point. These steps can go a long way in preserving peptide integrity.
sbb-itb-7164bd9
Storage, Handling, and Documentation Errors
Once you've successfully reconstituted a peptide, the next challenge is preserving its integrity through proper storage, handling, and documentation. Even the best reconstitution techniques won't matter if these steps are mishandled. Ensuring these processes are done right is vital to maintaining the peptide's effectiveness from preparation to administration.
Incorrect Storage Conditions
Reconstituted peptides are far more fragile than their lyophilized counterparts. While lyophilized peptides can remain stable for 2–5 years at –20°C, reconstituted peptides typically last only 4–8 weeks under optimal refrigerated conditions (2–8°C). Leaving a reconstituted vial at room temperature can cause significant degradation in just a few hours.
To protect the peptides:
- Store vials upright and away from the refrigerator door to avoid temperature fluctuations and minimize contact with the stopper.
- Shield vials from light exposure, as certain amino acids like tryptophan and tyrosine are prone to oxidative damage. Keep them in their original box or wrap them in aluminum foil.
Freezing reconstituted peptides is another common mistake. Ice crystal formation can irreversibly damage the peptide's molecular structure. The only exception is when aliquoting the solution into single-use portions. If using low-protein-binding polypropylene tubes (e.g., Eppendorf LoBind), you can freeze these aliquots immediately after reconstitution. However, thaw only one aliquot at a time and never refreeze.
Using Peptides Past Their Stability Window
The stability of reconstituted peptides depends on the solvent used. For example, peptides mixed with BAC water are stable for up to 28 days, while those mixed with sterile water have a much shorter window - just 24 hours. This makes sterile water a higher-risk option for multi-dose applications.
"The calculation mistake here is assuming that a vial reconstituted three weeks ago still contains the same active concentration as when it was first mixed. Peptide degradation is real." - Prax Peptides
Proper labeling and tracking of stability windows are key to ensuring safe and effective use.
Labeling and Documentation Mistakes
Accurate labeling is essential in peptide therapy. Without noting the reconstitution date, there's no way to confirm if a vial is still within its safe use period. Additionally, failing to document the concentration or solvent used can lead to dosing errors or misinterpretations of stability.
Every vial label should include the following:
| Label Element | Purpose | Risk If Omitted |
|---|---|---|
| Peptide name | Identification | Wrong compound may be administered |
| Reconstitution date | Stability tracking | Use beyond the safe stability window |
| Concentration (mcg/mL) | Dosing accuracy | Potential for dosing errors |
| Solvent used | Safety reference | Misunderstanding stability (e.g., 24h vs. 28 days) |
| Beyond-use date | Expiration tracking | Increased risk of bacterial contamination |
| Storage instructions | Potency preservation | Loss of potency due to improper storage |
Label the vial immediately after reconstitution - before placing it in the refrigerator. It's also crucial to visually inspect the solution before each use. It should appear clear and colorless; any cloudiness, discoloration, or visible particles means the vial should be discarded. Neglecting these steps can compromise both the peptide's safety and its clinical accuracy.
Building a Consistent Reconstitution Workflow
Peptide Reconstitution: Step-by-Step Safe Preparation Workflow
Strong documentation and storage practices are crucial, but they only work if the clinic's overall workflow is just as reliable. The aim is to create a system where mistakes are rare, not routine.
Developing Clinic SOPs
A systematic approach to reconstitution builds on earlier guidance about avoiding storage and documentation errors. A clear SOP (Standard Operating Procedure) should cover seven essential steps: cleaning the workspace, swabbing vial tops, drawing bacteriostatic water, injecting with the wall-trickle method, allowing passive dissolution, performing a visual inspection, and labeling before refrigeration.
Two areas are especially important for making sure the SOP works in practice: calculation accuracy and vial tracking. Keep a detailed log that includes reconstitution dates, solvent volumes, calculated concentrations, and doses drawn. Don’t forget to account for syringe dead volume, which can range from 0.02–0.07 mL per draw, to avoid gradually under-dosing patients.
Using Clinical Tools to Reduce Errors
One way to reduce errors is by using automated calculators. These tools help avoid manual math mistakes, like misplacing a decimal point and accidentally creating a 1,000-fold dosing error. Automated tools handle unit conversions, syringe calibration, and volume optimization, so staff can focus on perfecting their technique instead of struggling with complex calculations.
"Knowing your exact water volume and dose measurement ahead of time lets you focus on technique instead of math." - FormBlends
For example, PeptidePrescriber provides a free reconstitution calculator, unit conversion tool, and dosing protocols specifically designed for clinical environments. These tools minimize the manual steps where errors often occur, especially for staff new to peptide therapy. The platform also offers injection guides that reinforce proper techniques, like the wall-trickle method, ensuring alignment between SOPs and digital aids. By integrating these tools into daily workflows, clinics can significantly reduce real-time mistakes.
Staff Training and Competency Checks
Training isn’t a one-and-done process - it needs to be continuous. Over time, staff may unintentionally develop shortcuts or bad habits that undermine consistency. Regular audits can help catch subtle issues, such as leaving vials at room temperature for too long (more than 2 minutes), storing vials horizontally (which increases oxidation risk at the stopper), or swabbing vial tops with a back-and-forth motion instead of a single-direction wipe.
Math skills also require regular attention. Staff should double-check calculator outputs, as errors can sometimes be spotted by recognizing unusual results - like a nearly full syringe measurement, which might signal a problem. Routine reviews and tool-assisted checks are key to identifying and correcting both technique drift and calculation errors early.
Conclusion: Keeping Peptide Reconstitution Safe and Accurate
Reconstituting peptides might seem straightforward, but even small errors - like miscalculations, using the wrong solvent, contamination, or improper storage - can lead to significant problems. Following standardized SOPs, leveraging digital tools, and ensuring regular training can help avoid these pitfalls.
A single decimal point error could lead to a dosing mistake that's off by 1,000 times. These kinds of errors aren't uncommon, especially in busy clinical environments without proper systems in place.
"Minor mistakes can quickly render a vial ineffective." - FormBlends
For clinics working to refine their peptide programs, PeptidePrescriber provides free tools such as a reconstitution calculator, unit conversion tool, and injection guides. These resources are designed to simplify workflows and minimize errors. When combined with the SOPs and training practices covered in this article, these tools support a seamless process - from preparation to storage - ensuring precise and effective peptide reconstitution.
FAQs
How can I quickly sanity-check my dose math before drawing a syringe?
When working with peptide doses, it's always smart to double-check your math. Even if you're confident in your calculations, using a reliable peptide reconstitution calculator can save you from potential errors. These tools are designed to simplify the process and ensure you're on track.
If you're doing the math manually, here's a quick breakdown:
- Step 1: Divide the total amount of peptide (in micrograms) by the volume of bacteriostatic water you’ve added. This gives you the concentration in mcg/mL.
- Step 2: Multiply your target dose (in mL) by 100 to determine the correct units for a U-100 syringe.
For added peace of mind, platforms like PeptidePrescriber provide tools that help maintain accuracy and compliance throughout the process.
What should I do if my peptide turns cloudy or gels after refrigeration?
If your peptide solution looks cloudy or forms a gel after being refrigerated, don't worry - this is typically a reversible physical reaction, not a sign of degradation. To fix it, try gently warming the vial in your hands. If the cloudiness doesn’t clear up, let the solution sit at room temperature and give it a gentle swirl. Keep in mind that slight opalescence is normal for certain peptides. Always check the solution for clarity before using it.
When should I discard a reconstituted vial even if it looks clear?
When dealing with a reconstituted peptide vial, discard it immediately if you notice visible particles, floating fibers, unusual discoloration, or if it stays cloudy even after waiting 30–60 minutes. Additionally, if the vial was mixed with non-preservative sterile water and has been stored for more than a few hours, it should also be discarded. Before use, always inspect the vial under a proper light source to confirm its safety and sterility.