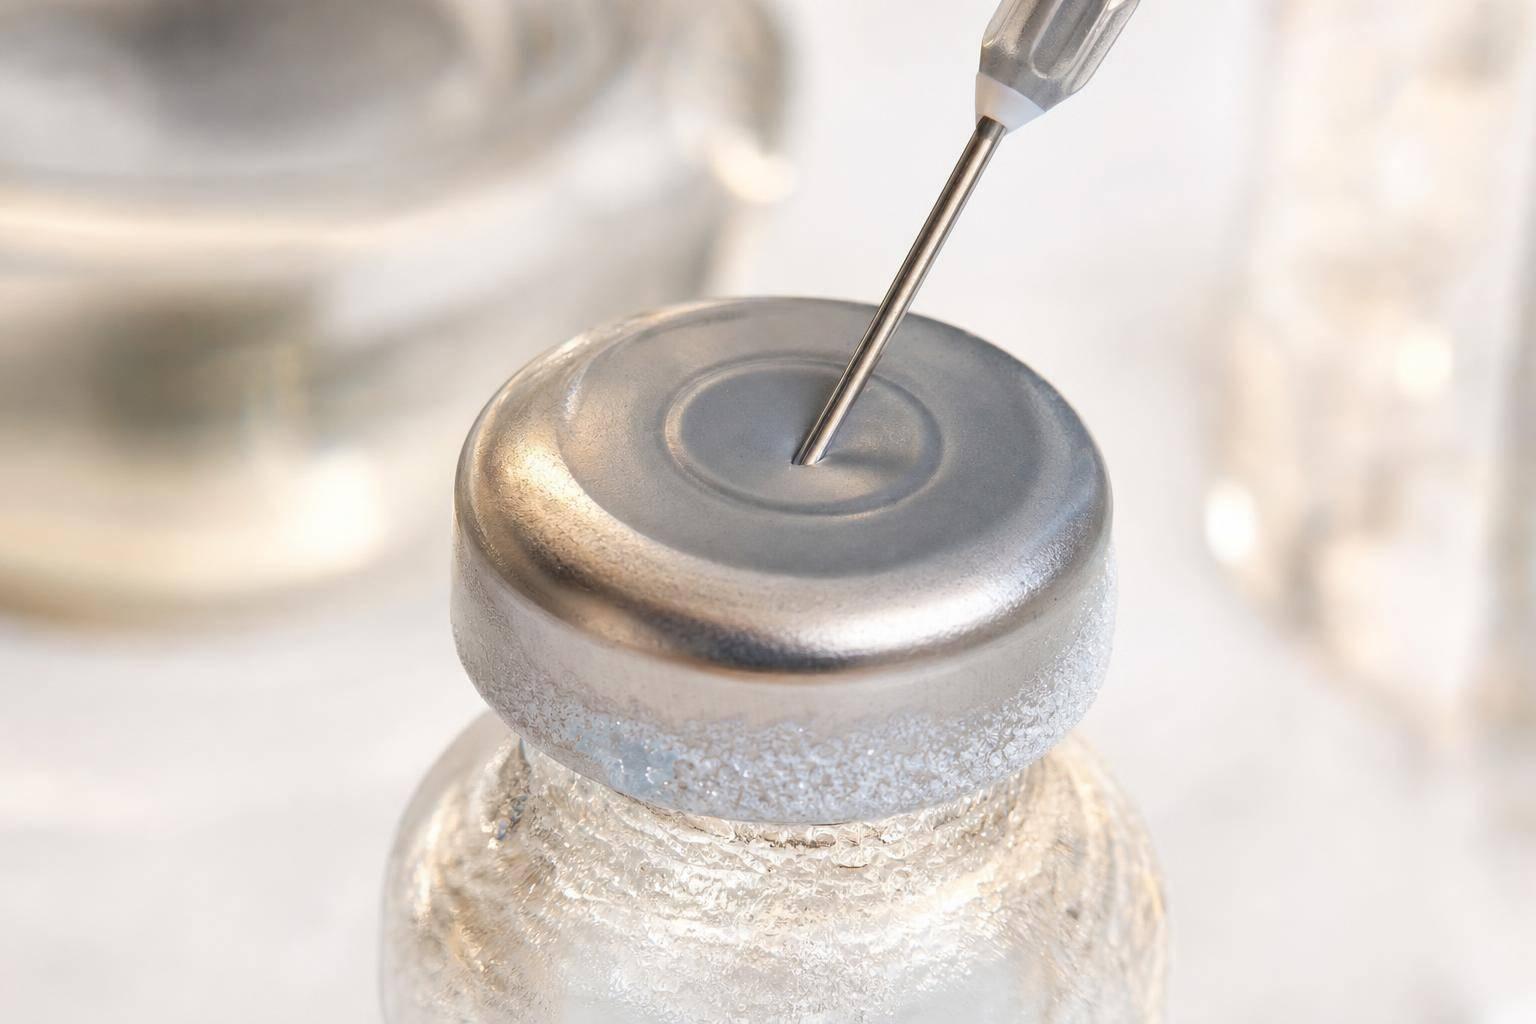
A vial stopper is compatible only if it keeps the vial sealed, survives needle punctures, reseals after use, sheds little to no rubber, stays chemically clean, and still works after cold storage. For peptide products, that means checking six areas: seal integrity, puncture force, reseal performance, fragment control, chemical interaction, and storage stress.
If I had to boil the article down to the parts that matter most, it would be this:
- I need the stopper, vial, and crimp cap to work as one closure system
- I need needle penetration force at or below 10 N
- I need low fragment risk, with USP guidance allowing no more than 5 visible rubber fragments
- I need proof that the stopper can reseal across the planned puncture count
- I need extractables/leachables and adsorption data for the actual peptide formula
- I need CCI testing during cold exposure, after warmup, and after temperature swings
For peptide handling in the U.S., this matters because vials are often refrigerated, reconstituted, and punctured more than once. That creates stress from cold temperatures, repeated needle entry, and longer in-use storage. Even a stopper that looks fine can still fail by letting in oxygen, moisture, or microbes - or by pulling peptide onto its surface.
A few numbers stand out:
- 3%–5% interference fit is a common target for stopper-to-vial sealing
- 2%–10% may be used as a broader design range
- 0.76 mm or more of seal skirt overhang length is a common crimp target
- Shore A 40–50 is often used for softer stopper compounds
- 50–100 µm fluoropolymer coatings can lower contact between drug and rubber
- -58°F to -83°F (-50°C to -65°C) is the usual glass transition range for pharma butyl rubber
Here’s the plain-English takeaway: fit first, then test under use conditions. I’d review material type, coating, hardness, stopper dimensions, crimp setup, needle gauge, puncture count, formulation contact, and storage temperature as one package - not as separate parts.
If you want a fast way to judge a stopper system, use this checklist:
| What I check | What I’m looking for | Main failure if it goes wrong |
|---|---|---|
| Material and coating | Low permeability, low extractables, low adsorption | Peptide loss, leachables, moisture or oxygen entry |
| Fit and crimp | Proper interference and crimp geometry | Microleaks, weak seal, stopper movement |
| Puncture force | ≤10 N with the planned needle | Hard access, tearing, poor user handling |
| Reseal | Holds after the full puncture count | Microbial ingress, leakage |
| Fragmentation | Minimal coring and particles | Rubber in solution |
| Cold and cycling stress | Seal holds cold and after warmup | Hidden CCI failure during storage |
So the short answer is simple: a stopper is compatible when it passes mechanical, chemical, and temperature testing in the exact way the peptide vial will be used. The rest of the article explains how to check each of those points.
Penetrability Tester for Vial Rubber Stoppers - by PackTest.com
Material and fit factors that affect stopper performance
Material choice and physical fit decide whether a vial stopper will seal, puncture, and reseal the way it should. In plain terms, they set the starting point for every later performance test.
Elastomer type, coatings, and performance properties
Butyl and halobutyl rubbers - chlorobutyl and bromobutyl - are the main elastomer families used for injectable peptide vials in the U.S. They offer low gas and moisture permeability, solid puncture behavior, and dependable reseal performance. That matters when you’re dealing with oxygen- or moisture-sensitive peptides, as well as lyophilized products.
Butyl rubber is soft and resilient. That makes it fairly easy to puncture while still sealing well under compression. For patients using 29–31G insulin syringes for subcutaneous dosing, that’s a useful tradeoff. Halobutyl grades are often selected when lower protein adsorption and a cleaner extractables profile matter more. That comes up with peptides that may bind to elastomer surfaces, or with formulas that contain excipients that interact harshly with uncoated rubber. Natural rubber is usually avoided because it brings more protein contamination and higher extractables. Steam autoclaving at 121 °C has little effect on most halobutyl closures, while gamma irradiation at 10–40 kGy can increase extractables and change hardness and needle lubricity.
If a formula uses bacteriostatic water with 0.9% benzyl alcohol, uncoated rubber can show higher extractables during long contact times. Fluoropolymer-coated stoppers help by putting a chemically inert barrier - usually 50–100 µm thick - between the drug and the elastomer. That cuts leachables and surface adsorption, though it can come with a small bump in initial puncture force. The coating handles the chemistry. The elastomer underneath still does the resealing. For adsorption-prone or multi-dose peptide products, coated stoppers are often the better pick.
| Material category | Puncture behavior | Chemical resistance / extractables | Typical use in peptide products |
|---|---|---|---|
| Uncoated butyl rubber | Low modulus; easy puncture; good reseal with common clinical needle gauges | Good gas/moisture barrier; moderate extractables; compatible with aqueous buffers and steam sterilization | Lyophilized single-use peptide vials; simple aqueous multi-dose formulations |
| Uncoated halobutyl (chlorobutyl/bromobutyl) | Similar to butyl; can be slightly firmer; robust reseal | Improved chemical resistance vs. standard butyl; lower protein adsorption; cleaner extractables than natural rubber | Adsorption-prone peptides; cold-chain storage applications |
| Fluoropolymer-coated butyl/halobutyl | Slightly higher penetration force; reliable reseal from underlying elastomer | Excellent leachables barrier; highly resistant to benzyl alcohol and many organic excipients | Multi-dose peptide vials with bacteriostatic water; sensitive or high-value peptides requiring long-term leachables control |
Hardness, diaphragm thickness, and surface lubricity also shape stopper behavior.
Softer butyl or halobutyl compounds, around Shore A 40–50, usually lower penetration force and help reduce needle tip deformation. But there’s a limit. If hardness drops too much, the stopper may tear instead of puncturing cleanly, which increases fragmentation risk. Thicker diaphragms tend to improve reseal and dimensional stability, but they also push puncture force up. Surface lubricity - usually from silicone oil or a low-particle dry lubricant - cuts friction during needle insertion and helps limit the tearing that leads to coring.
USP <381> sets a maximum piercing force of ≤10 N and allows no more than 5 visible rubber fragments after multiple punctures. So these material choices are not just lab details. They directly affect puncture force, reseal performance, fragment control, and compliance.
Dimensional fit, compression, and crimp variables
Once the material is chosen, geometry takes over. A stopper can use the right rubber and still fail if the fit is off.
Interference fit means the stopper plug diameter is intentionally a bit larger than the vial neck inner diameter. When inserted, the plug compresses radially and forms the primary seal even before the aluminum crimp cap goes on. Industry guidance often aims for about 3–5% interference for many vial stoppers, with 2–10% used as a broader acceptable range depending on the design. Too little interference can create leak paths and weak container-closure integrity. Too much can stress the glass neck or even cause stopper lift-out during storage.
The crimp cap then finishes the closure through a dimensional match between stopper flange height, vial crown height, and aluminum seal skirt length. These three dimensions control how much skirt material folds under the vial flange during crimping. That fold is called seal skirt overhang length (SSOL).
Practical guidance points to an SSOL of about 0.76 mm or more for an acceptable crimp. Drop below that, and the seal may not lock under the flange well enough, which increases leakage or microbial ingress risk. Go too far the other way, and you can get skirt wrinkling, uneven compression, and even glass scratches or microcracks that shed particles.
Probabilistic modeling also shows that stopper top height and outer diameter are major drivers of residual seal force (RSF) magnitude.
| Dimensional variable | Role in closure performance | Failure mode it helps prevent |
|---|---|---|
| Stopper plug diameter | Sets radial compression against vial neck ID | Insufficient interference → leak paths; excessive interference → glass stress or stopper lift-out |
| Interference fit (%) | Determines primary seal force before crimping | Microleaks, poor CCI, sterility loss |
| Stopper flange height | Contributes to dimensional alignment and compression under crimp cap | Under-compression → weak seal; over-compression → visual defects, uneven RSF |
| Vial crown height | Defines available space for stopper flange and skirt fold | Incorrect SSOL → poor crimp formation |
| Aluminum seal skirt length | Determines SSOL and material available for crimping | SSOL too small → insecure crimp, leakage risk |
| Stopper top height and outer diameter | Key drivers of RSF magnitude | Low RSF → mechanical instability; excess RSF → visual defects |
Check dimensional alignment against component drawings before CCI testing. After material and fit are locked in, test puncture, reseal, fragment control, and CCI under actual use conditions.
Performance during use: puncture, reseal, and fragment control
Material choice and stopper dimensions are the starting point. But that only gets you so far. For peptide vials, performance has to hold up during actual use.
That means testing the stopper the way people will use it: the planned puncture count, the needle gauge, and how the vial is stored between doses. Those details shape the force testing, reseal checks, and puncture-count limits that come next.
Needle penetration force and repeated puncture behavior
Needle penetration force is the peak load needed to push a needle through the stopper diaphragm. When screening closure options, use the same ≤10 N limit.
A few variables can push that force up or down. Harder elastomers, thicker diaphragms, and some surface treatments add resistance. Smaller needle gauges, sharper long-bevel tips, and straight, perpendicular entry tend to lower it.
Why does this matter? Because high or uneven force can cause trouble at the point of use. Users may puncture at an angle, tear the stopper, or apply too much hand force during at-home injections. That’s not a small detail. It affects both handling and dose access.
Use penetration-force results to set the right needle gauge and access method. Those data should also go into the compatibility report and help define needle gauge guidance and puncture-count limits.
Reseal performance after 1 or more punctures
Once the needle is removed, resealing depends on elastic recovery and storage temperature. At refrigerated temperatures, elastomer chain mobility slows down, which can affect how fast and how fully the puncture site closes between doses.
For single-use vials, the expectation is narrower. The stopper needs to keep integrity after one puncture, and then the product should carry conservative discard directions.
Repeated-access peptide vials need more proof. Reseal performance should be shown across the maximum intended puncture count under the same storage and handling conditions expected in use. In plain terms, if the vial will be used cold and accessed more than once, the test should reflect that.
Use the test method that fits the access pattern and storage setup:
- For repeated-access vials, use a self-sealing test
- For older closure qualification protocols, use a dye-ingress test
Run both under the intended use conditions.
If resealing checks out, one issue still remains: repeated punctures may create fragments.
Coring and fragmentation risk during vial access
Coring happens when the needle removes a plug of stopper material instead of piercing it cleanly. That plug can fall into the vial as a visible or subvisible particle.
The risk goes up with:
- Larger needle bore
- Blunt or short-bevel tips
- Angled insertion
- Twisting during entry
- Damage that builds up over repeated punctures
Needle size has a clear effect. In one study, coring was frequent with 18-gauge needles and rare with 22-gauge needles.
The stopper itself also matters. High filler content, poor filler dispersion, or incompatible lubricants can weaken the elastomer matrix and make fragmentation more likely.
For multi-dose peptide vials, fragmentation testing should match the maximum intended puncture count. Use visual inspection after each puncture group, then perform subvisible particle counting at the end. Needle gauge, entry angle, and vial size should match the validated puncture limit. After that, mechanical access results should be checked against chemical compatibility and temperature effects.
sbb-itb-7164bd9
Chemical compatibility and temperature effects
After puncture, reseal, and fragment testing, you still need to check one more thing: whether the closure stays chemically stable and keeps sealing at the storage temperature you plan to use. Mechanical tests tell part of the story, but chemistry and temperature can still cause trouble.
Extractables, leachables, and adsorption risk
Extractables are compounds pulled from a stopper under worst-case lab conditions. Leachables are the portion that actually moves into the finished formulation during intended storage.
For peptide products, that distinction matters a lot. It’s not enough to ask what a stopper can release. You need to know what the formulation does pick up over time. A stopper may pass general extractables limits and still create peptide-relevant leachables under actual formulation and storage conditions. Studies of rubber-stoppered biopharmaceutical vials have found volatile hydrocarbons and antioxidants, including butylated hydroxytoluene (BHT), showing up as leachables in ways that match stopper extractables profiles. That’s why product-specific leachables testing under the intended formulation and storage conditions is the right check for long-term compatibility.
Adsorption is a different problem, but it sits right next to leachables in practice. Peptides, especially at low concentration or with hydrophobic regions, can stick to the stopper surface and, in effect, vanish from the formulation. Hydrophobic preservatives like benzyl alcohol, phenol, or m-cresol can also be sorbed by some rubber closures, which lowers preservative levels. If the peptide concentration is low, even a modest amount of adsorption can take out a meaningful share of the dose. Track both active peptide and preservative levels over time. If the closure uses a coating, that coating also needs extractables testing so it doesn’t bring in a new chemistry issue.
Low-temperature storage, stress relaxation, and thermal cycling
Cold storage changes more than puncture force. It also changes seal force and container-closure integrity.
Refrigerated stoppers get stiffer. That can push puncture force up and slow reseal. At frozen temperatures around 0 to −4°F (−18 to −20°C), they lose elasticity and may open micro-gaps at the rubber-glass interface.
The glass transition temperature (Tg) for pharmaceutical butyl rubber stoppers is usually around −58°F to −83°F (−50°C to −65°C). Below that range, container-closure integrity (CCI) failures can happen. The tricky part is that you may not see them after the vial warms up. The elastomer can recover and reseal, while gas or contaminants that got in during cold exposure stay trapped inside the vial.
Thermal cycling adds another layer. Repeated cold-to-warm swings can drive compression set, which means a permanent drop in the stopper’s ability to hold sealing force. That matters most for refrigerated vials used more than once. The best way to catch this drift is to test seal force across the full temperature range you expect, then pair that with CCI checks during cold exposure and again after warmup.
Risk table for chemistry and temperature
Use the same risk factors to match each closure system with the right analytical test.
| Risk Factor | Condition | Verification Method |
|---|---|---|
| Extractables migration | Worst-case lab conditions (solvents, heat) | Extractables profiling (LC-MS, GC-MS, ICP-MS) |
| Leachables in formulation | Intended storage conditions, including refrigerated and room-temperature use | Targeted leachables study under use conditions |
| Peptide or preservative adsorption | Low-concentration peptides; benzyl alcohol-containing diluents | Adsorption study tracking active peptide and preservative over time |
| Transient CCI failure at frozen or ultra-low temperatures | Frozen or ultra-low storage | Container-closure integrity testing during cold exposure and after warmup |
| Compression set from thermal cycling | Repeated cold-to-warm transitions | Mechanical characterization after defined cycle counts; CCI at cycle endpoints |
Test methods and a step-by-step compatibility workflow
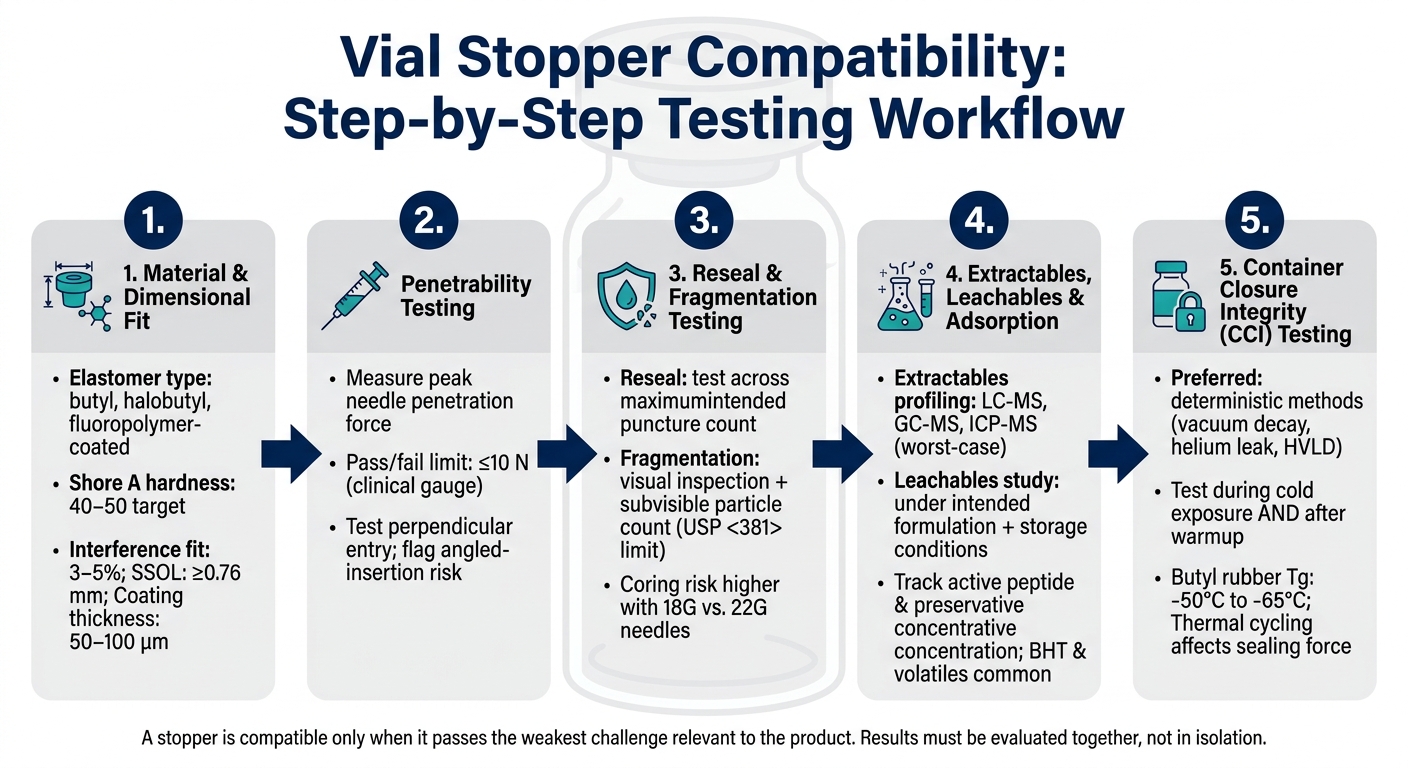
Vial Stopper Compatibility: Step-by-Step Testing Workflow
Once you've worked through chemistry and temperature risks, the next step is testing the stopper in a way that matches how the product will actually be used. Each test checks a different kind of failure. So the job here is simple: pair the test with the risk.
Core tests: penetrability, reseal, fragmentation, extractables and leachables, and CCI
These tests check puncture performance, resealing, particle shedding, chemical interaction, and seal integrity under the intended use conditions. Run them with the same closure setup, needle gauge, puncture count, and storage conditions defined above.
Penetrability testing measures how much force it takes for a needle to pierce the stopper. Use the intended clinical needle gauge and apply the ≤10 N screening limit.
Reseal performance checks whether the stopper seals again after one or more punctures. Match the test to the intended puncture count and storage condition.
Fragmentation (coring) assessment looks at particulate risk during vial access. Test coring with the intended needle gauge, puncture count, and particle-count endpoint.
Extractables and leachables (E&L) studies identify chemical species that move from the stopper into the formulation. Use extractables studies to map worst-case stopper chemistry, then use leachables studies to measure what enters the formulation during intended storage. The E&L program should also track active peptide and preservative concentrations over time. That helps catch adsorption losses that standard chemical screens can miss.
Container closure integrity (CCI) testing confirms that the vial-stopper-crimp system keeps a tight seal through shelf life and distribution stress.
Deterministic integrity methods vs ingress-based methods
After the functional and chemical work, the next check is seal performance with a CCI method that fits the development stage. USP <1207> makes a clear distinction between deterministic methods and ingress-based methods.
Deterministic methods measure leaks through quantitative physical measurements. This group includes vacuum decay, helium leak detection, high-voltage leak detection (HVLD), and laser-based headspace gas analysis. These methods produce objective, calibrated data, which is why they are the preferred primary CCI approach for qualification and stability work.
Ingress-based methods - including dye ingress, bubble emission, and microbial challenge - depend on a challenge agent entering the package. They give qualitative pass/fail results and are best used as supportive or supplemental tests.
| Feature | Deterministic Methods | Ingress-Based Methods |
|---|---|---|
| Principle | Quantitative physical measurement (e.g., vacuum decay, helium leak) | Qualitative observation of agent entry (e.g., dye, microbial) |
| Sensitivity | High; can detect very small leaks | Lower; depends on visible dye or microbial growth |
| Common Use | Development qualification and stability studies | Supportive testing and supplemental verification |
| Outcome | Quantitative data and pass/fail based on measured limits | Pass/fail based on observed contamination |
For peptide vial qualification, use deterministic methods as the primary CCI tool during development and stability testing. Ingress-based methods can support routine monitoring where appropriate.
Conclusion: how to judge stopper compatibility before clinical use
A full compatibility assessment follows a clear sequence. Start with material suitability and dimensional fit. Then move to functional tests like penetrability, reseal, and fragmentation. After that, evaluate chemical interaction through E&L studies. Finish by checking seal integrity with CCI testing across the full temperature range the product will face. Skip one step, and you leave a blind spot that may not show up until clinical use.
The results need to be read together, not in isolation. A closure is only compatible if it passes the weakest challenge that matters for the product. The table below ties each measurement to the clinical issue it helps prevent.
| What Is Measured | Why It Matters | Failure Mode Detected |
|---|---|---|
| Penetration force (≤10 N limit) | Confirms usable needle access | Needle damage, stopper push-in, clinician difficulty |
| Reseal after repeated punctures | Protects sterility between multi-dose withdrawals | Microbial ingress, leakage, preservative loss |
| Particles ≥150 µm after puncture | Prevents particulate administration | Coring, rubber fragments in solution |
| Leachables in final formulation | Confirms chemical safety and peptide stability | Peptide degradation, toxicologically relevant impurities |
| Peptide and preservative concentration over time | Catches adsorption losses not visible in chemical screens | Dose reduction, preservative failure |
| CCI leak rate across storage and distribution conditions | Verifies seal integrity through shelf life and handling | Sterility breach, oxidation, potency loss |
FAQs
How do I know if a stopper is truly compatible with my peptide vial?
Check whether the solution still looks normal after use. Watch for signs that the stopper may not be compatible with the vial contents, such as cloudiness, haziness, visible particles, discoloration, or an unusual odor.
If you see floating flakes or fibers, the stopper may no longer be keeping the vial sterile or chemically stable. If anything seems off, discard the vial right away.
Which stopper material is best for multi-dose peptide products?
For multi-dose peptide preparations, the main issue is simple: can the vial stopper hold up after repeated needle punctures while still helping block contamination?
The sources don’t point to one single “best” rubber polymer. What they do stress is compatibility with bacteriostatic water that contains 0.9% benzyl alcohol.
For day-to-day handling, technique matters just as much as the stopper material. To lower the risk of fragments during multi-dose use:
- Wipe the stopper with 70% isopropyl alcohol for 10 to 15 seconds
- Let it air-dry completely
- Insert the needle at a slight angle
Why should CCI testing include cold storage and temperature cycling?
CCI testing should include cold storage and temperature cycling to confirm the seal stays intact under conditions that match a peptide preparation’s lifecycle.
Here’s why that matters: shifts in temperature can make packaging parts expand and contract. Over time, that movement can weaken the stopper seal and increase the chance of air or contaminants getting in. It’s a small change with a big effect.
Testing at refrigerated storage conditions (36–46°F) helps check that container integrity holds up during:
- transport
- storage
- use
This gives you a clearer picture of how the package performs outside a static lab setup and under the day-to-day conditions the product is likely to face.