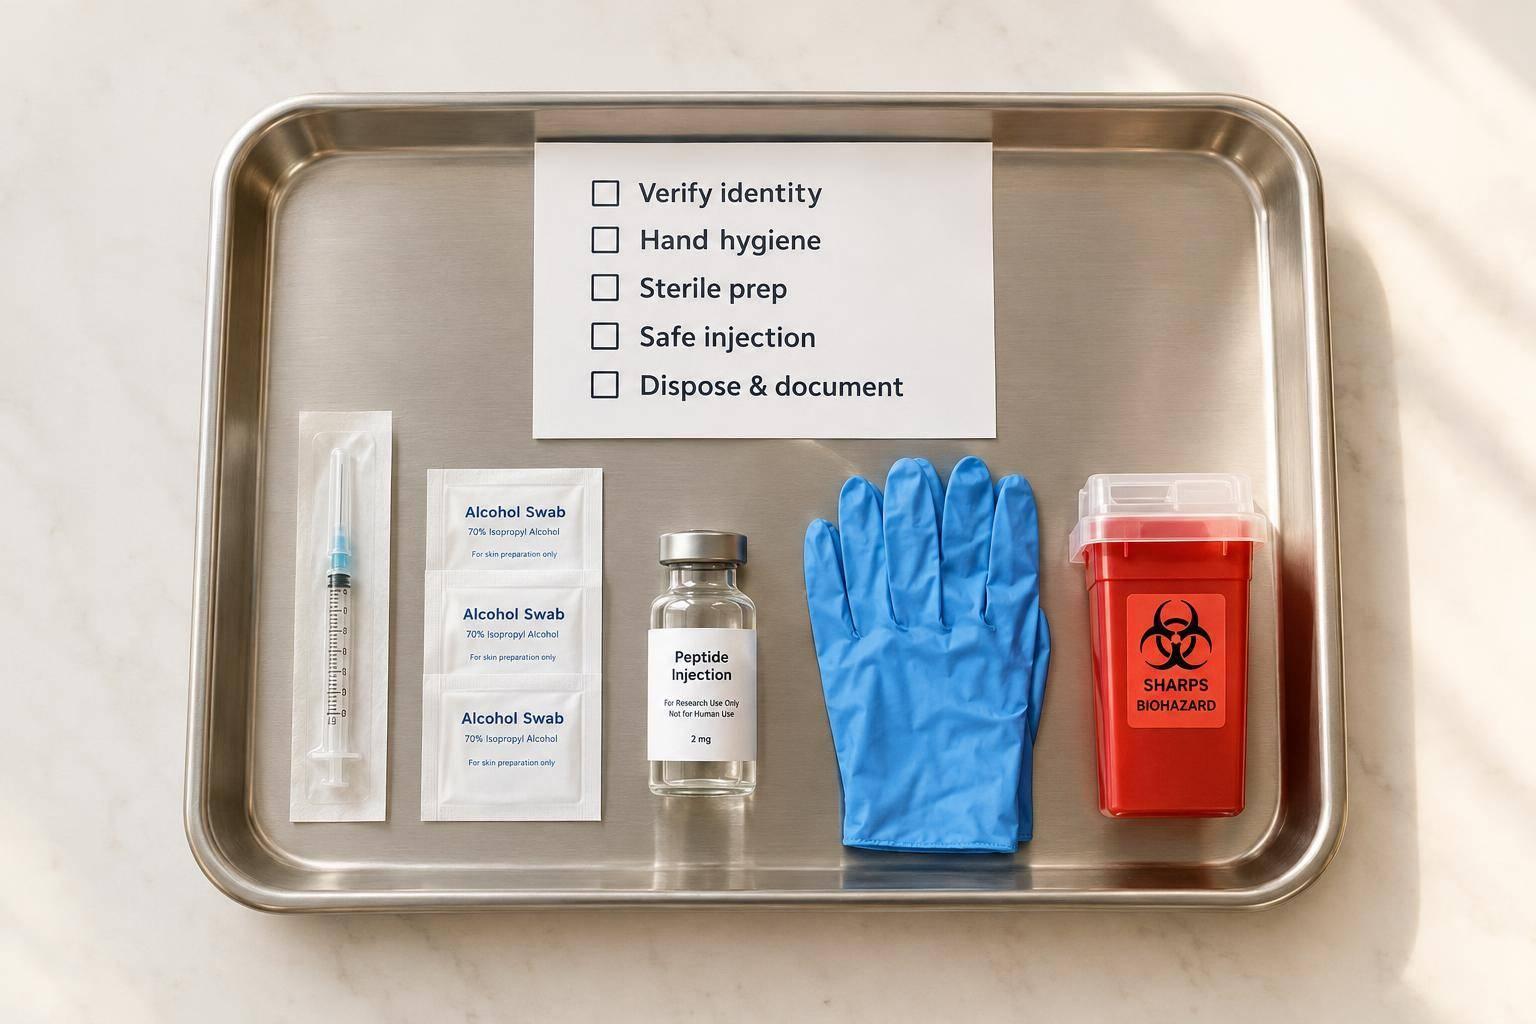
My rule for peptide visits: verify first, prevent contamination, and stop if anything is unclear. Start with 2 patient identifiers, confirm the order and product label, and check storage and dating before preparing a dose.
I use this checklist to keep each stage in view:
- Before preparation: Check the medication, concentration, dose, route, supplies, and product-specific instructions.
- During preparation: Clean the workspace, perform hand hygiene, disinfect vial septa with 70% alcohol, and let them dry. Verify calculations and label the dose when required.
- At the bedside: Recheck the patient and order, inspect and disinfect the skin, let it dry, and use sterile, single-use equipment.
- After injection: Discard sharps immediately, assess for reactions, and provide written aftercare. Observation time depends on the product and patient - not a fixed rule for all peptides.
- At closeout: Document the dose and findings, report concerns, reset the workspace, and review staff practices.
Aseptic technique reduces contamination risk; it does not establish whether a peptide is safe, effective, or legally supplied. I use this checklist alongside prescribing information, pharmacy directions, and facility policy. <u>If identity, dosing, or sterility is uncertain, stop and seek guidance.</u> For an acute reaction, activate the emergency protocol rather than waiting for routine clarification.
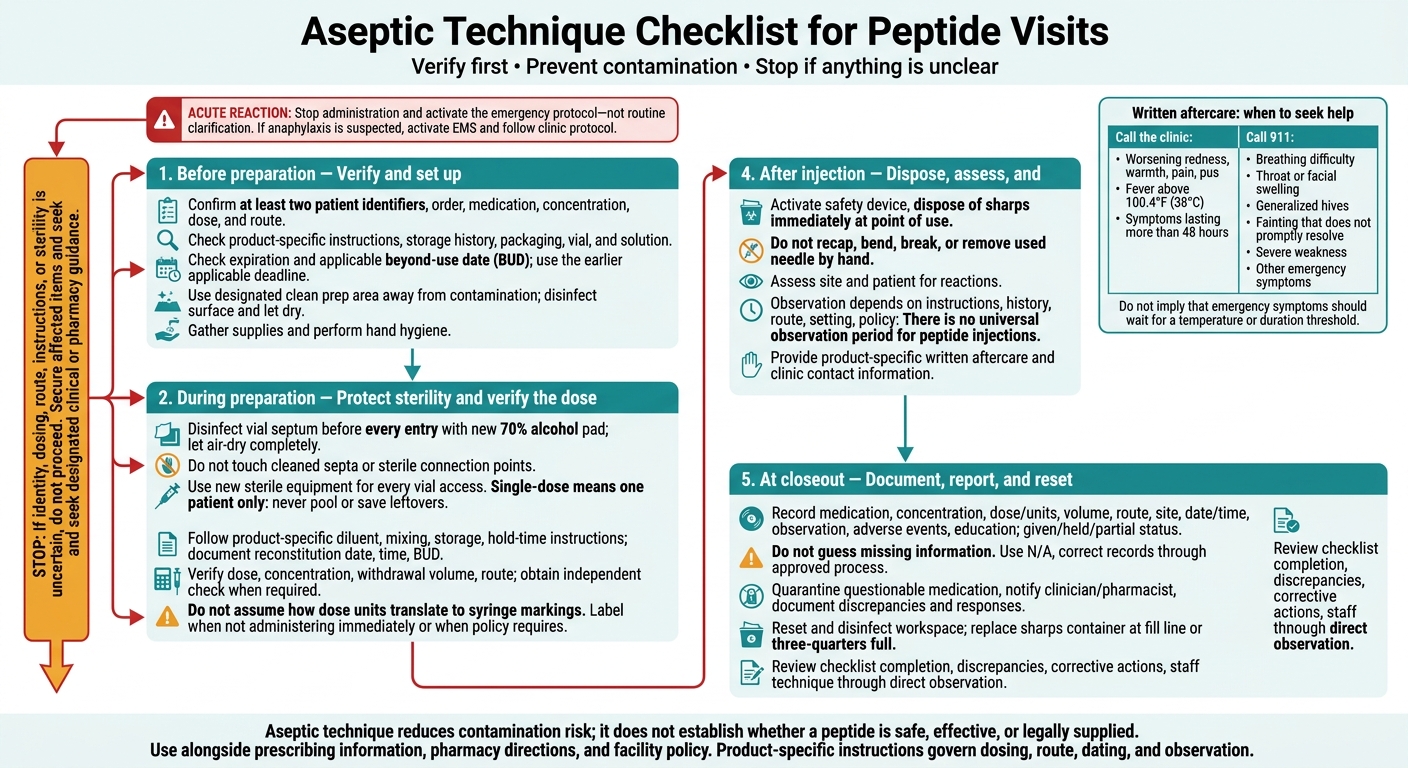
Aseptic Technique Checklist for Peptide Visits
CDC Vaccine Training – Aseptic Technique
sbb-itb-7164bd9
Before the Visit: Set Up Supplies and Medication
Set up a designated, clean preparation area away from sinks, water sources, used equipment, blood or body fluids, and the immediate patient-treatment area. Disinfect the work surface before the session and whenever it becomes soiled or contaminated. Follow the disinfectant’s instructions, and let the surface dry before placing supplies on it. Gather only what you need for this patient and dose.
Check Supplies, Storage, and Expiration
Before opening supplies, check that the product matches the verified order. Review storage records against the product’s specific requirements. Check both the manufacturer’s expiration date and any applicable beyond-use date (BUD), and use the earlier applicable deadline. Follow the labeling, pharmacy instructions, and facility policy for dating after opening or reconstitution. Quarantine products with unknown storage history, temperature excursions, or unclear dating until those questions are resolved.
Inspect the vial, stopper, packaging, and solution for damage or unexpected appearance. Gather only the needed medication, authorized diluent, sterile single-use needles and syringes, alcohol pads, labels, required gloves, and an accessible sharps container.
Perform hand hygiene before preparation. Use an alcohol-based hand rub if your hands are not visibly soiled, or soap and water if they are visibly dirty or contaminated. Replace compromised supplies - don’t use them.
Disinfect the Vial Septum Before Every Entry
Confirm that the vial matches the order and check its labeled status. Single-dose means one patient only: never pool or save leftovers. Dedicate multidose vials to one patient when possible. Keep shared vials in the clean medication area, outside immediate treatment areas. Follow the applicable opening, storage, and discard rules rather than assuming a 28-day window.
Remove the cap without touching the septum. Before every entry - including entry into a diluent vial - disinfect the septum with a new 70% alcohol pad and let it air-dry completely. Do not touch, wipe, fan, or blow on the cleaned septum.
Use new sterile equipment for each access. Keep syringe tips, needle hubs, and needle shafts from being touched, and never leave a needle in the septum between uses.
Prepare and Verify the Dose
Follow the product-specific instructions for peptide reconstitution, storage, and mixing, as well as volume, concentration, and hold time. Document the reconstitution date, time, and BUD. Verify the prescribed dose, concentration, withdrawal volume, and route. Get an independent check when policy requires it.
Do not assume how dose units translate to syringe markings. Label any syringe that will not be administered immediately, or whenever policy requires labeling. Include the medication name, concentration, dose or volume, preparation date and time, applicable BUD, and preparer identification.
Stop if calculations are uncertain, labels conflict, the product looks unexpected, or contamination may have occurred. This includes touching a sterile component or entering through a septum that has not been disinfected. Set affected items aside and get designated clinical or pharmacy guidance before proceeding. Once the dose is verified and labeled, move to bedside skin prep.
At the Bedside: Prepare the Skin and Inject
Once the dose is verified and labeled, move to the bedside checks.
Confirm Patient Identity and Inspect the Site
Use at least two patient identifiers, such as full name and date of birth. Match them against the order and medical record, then explain the procedure.
Review allergies, past injection reactions, and any new symptoms or concerns. If the reaction history is unclear or points to a safety issue, check with the responsible clinician before proceeding.
Inspect the site for redness, swelling, bruising, tenderness, induration, rash, drainage, scarring, or broken skin. Do not inject through compromised skin. Choose a site that fits the prescribed route, product instructions, patient’s age and body size, and facility protocol. For repeated subcutaneous injections, follow a documented rotation plan across approved sites.
Disinfect the Skin and Let It Dry
Perform hand hygiene before preparing the skin and after removing gloves. Wear gloves when anticipated exposure, facility policy, or the patient’s condition requires them. Gloves do not replace hand hygiene. If the skin is visibly soiled, wash it with soap and water first.
Use a facility-approved, single-use antiseptic according to its labeling and facility protocol. Apply it from the center outward and let the skin air-dry completely. Follow the product’s required contact time. Do not touch, wipe, blow on, or fan the site while it dries.
If the site is touched or otherwise contaminated, repeat the preparation with a new swab. If an allergy or sensitivity makes the usual antiseptic unsuitable, use only an approved alternative.
Inject With Sterile, Single-Use Equipment
Immediately before administration, recheck the medication name, dose, route, and site against the order. Choose the needle length, insertion angle, depth, and anatomical landmarks based on the prescribed route and product-specific instructions - not simply because the medication is a peptide. (Consult our clinical tools for dosing and reconstitution support.)
Pause for clarification if the route is missing, instructions conflict, or the equipment does not fit the patient’s anatomy.
Use a new sterile needle and syringe for every injection. Changing only the needle does not make a used syringe safe. If sterility is lost, stop and replace the affected equipment according to policy.
If wheezing or signs of an acute reaction develop, stop administration and activate the clinic’s emergency response.
After Injection: Dispose of Sharps and Monitor
Once the injection is complete, dispose of sharps immediately and assess the patient.
Dispose of Sharps at the Point of Use
Activate the safety device, if present, and place the used needle-and-syringe set in a sharps container at the point of use. The container must be closable, puncture-resistant, leak-resistant, and labeled or color-coded for biohazardous waste. Never force sharps into an overfilled container. Replace the container before its contents exceed the fill line.
Do not recap, bend, break, or remove a used needle by hand. Any required exception must use an approved method and follow facility policy and applicable requirements.
After disposal, check the injection site for bleeding, redness, swelling, bruising, or severe pain. If needed, apply gentle pressure with clean gauze. Avoid rubbing unless the product instructions say otherwise. Notify the licensed clinician about persistent bleeding, swelling that increases quickly, severe pain, suspected tissue injury, or other unexpected findings.
Check for Reactions and Explain Aftercare
Assess the patient for pain, redness, swelling, bruising, itching, and any other new symptoms. Determine observation needs based on the product instructions, patient history, injection route, setting, and facility policy. There is no universal observation period for peptide injections. A patient with symptoms should remain under observation until assessed and stabilized or transferred.
Promptly assess dizziness, faintness, altered responsiveness, breathing difficulty, wheezing, throat or facial swelling, and generalized hives. If anaphylaxis is suspected, activate EMS and follow the clinic protocol.
Before the patient leaves, provide product-specific written aftercare that includes the medication name and clinic contact information. Explain when to seek help:
- Call the clinic for worsening redness, warmth, pain, pus, fever above 100.4°F (38°C), or symptoms lasting more than 48 hours.
- Call 911 for breathing difficulty, throat or facial swelling, generalized hives, fainting that does not promptly resolve, severe weakness, or other emergency symptoms.
Then document the visit and reset the workspace. For more clinical insights on peptide therapy and best practices, visit our blog.
Visit Closeout and Daily Quality Checks
After administration and aftercare, finish the visit by completing documentation, reviewing discrepancies, and resetting the workspace.
Document the Visit and Report Safety Concerns
Complete the record promptly. Before signing, check the administration entry against the prescription, pharmacy label, product instructions, and organizational policy. Use explicit units and clear dates and times. Enter N/A for fields that do not apply rather than leaving them blank, and do not guess missing information. Store completed forms under the organization’s privacy and record-retention procedures.
| Field | Printable entry |
|---|---|
| Visit date | ____ / ____ / ______ (MM/DD/YYYY) |
| Patient identifier | ________________________ |
| Medication and concentration | ________________________ |
| Dose and units | ________________________ |
| Volume | __________ mL |
| Route | ________________________ |
| Injection site | ________________________ |
| Vial status | In date / intact / labeled / other (specify): ______ |
| Lot or batch number, if required | ________________________ |
| Date and time administered | ____ / ____ / ______ at ____:____ AM/PM |
| Observation period/findings | ________________________ |
| Adverse events | None observed / Yes - describe: ____________ |
| Education provided | ________________________ |
| Clinician initials | __________ |
| Clinician signature | __________________ Date: ____ / ____ / ______ |
Quarantine questionable medication according to policy, notify the clinician/pharmacist, and document both the discrepancy and the response. Use the required incident-reporting pathways for storage excursions, compromised vial seals or septa, suspected contamination or sterility failures, wrong medication, dose, patient, or route, needlestick injuries, blood or body fluid exposures, and clinically significant adverse events.
For occupational exposures, provide immediate first aid, notify the employer, and obtain prompt medical evaluation. Document the circumstances, work area, device type and brand if known, and actions taken. Correct records through the approved amendment process - never delete the original entry.
Then reset the workspace and complete the daily review.
Reset the Workspace and Review Staff Practices
Cleanup and daily review are part of aseptic control, not just paperwork.
Before the next visit, make sure the sharps container is upright, secure, and near the point of use. Replace it at the fill line, or when approximately three-quarters full if it has no marked fill line. Dispose of contaminated waste according to facility policy and applicable state and local requirements.
Clean and disinfect the preparation surface after use, following dilution and contact-time instructions. At the end of the day, disinfect high-touch surfaces, restock sterile single-use items, and remove expired, damaged, unlabeled, or compromised materials.
Daily review helps catch recurring aseptic lapses before the next visit. At day’s end, the designated reviewer should check that every visit checklist is complete, required initials or signatures are present, and discrepancies or adverse events were escalated. Compare completed administration records with scheduled or dispensed visits. Investigate missing records, duplicate entries, unexplained dose differences, and adverse-event reports that remain open.
Look for repeated problems: missing units, late documentation, incomplete observation notes, poor vial-status checks, storage concerns, supply shortages, or missed aseptic steps. Record the issue, contributing factor, corrective action, responsible person, and follow-up date. Use direct observation to confirm that staff follow aseptic technique in practice, not just on paper.
Use Supporting Clinical Resources
Licensed healthcare professionals can use PeptidePrescriber’s injection guides, dosing protocols, calculators, and regulatory references for staff training and checklist review. These resources do not replace verification against the prescription, pharmacy label, product instructions, and organizational policy. Independently check calculator outputs before documenting the final dose and volume.
Key Takeaways: Verify, Prevent Contamination, and Escalate
Run through these checks before sign-off:
Verify before preparing: Confirm the patient’s identity, medication match, dose, route, storage, expiration, and applicable beyond-use date (BUD) or discard date.
Prevent contamination: Perform hand hygiene and protect sterile connection points. Disinfect the vial septum with 70% alcohol before every access, then let it dry. Disinfect the skin and let it dry, too. Use a new sterile needle and syringe for every injection and vial access. Activate the safety feature when applicable. Discard sharps immediately at the point of use without recapping.
After administration, document and monitor: Record whether the dose was given, held, or partially administered. Do not proceed if identity, dosing, or sterility is uncertain, or if any safety concern exists. Secure the affected medication and equipment, notify the responsible clinician or pharmacist, and document the deviation and response. Escalate concerning symptoms through the clinic’s emergency and clinician-notification procedures.
FAQs
What if pharmacy directions conflict with clinic policy?
Follow your clinic’s established clinical protocols and standard operating procedures. Have clinical or legal staff review written clinic instructions, and use those instructions to guide staff training and patient care.
Keep patient handouts and injection instructions - including storage, syringe volume, and disposal - in line with your clinic’s protocols. If you depart from pharmacy directions, document the clinical rationale to maintain compliance and support patient safety.
How can we assess staff aseptic competency?
Check staff aseptic skills through continued training and regular audits to spot and correct technique drift. Verify that vials remain at room temperature for no more than two minutes and are stored upright to prevent oxidation. Disinfect vial tops by wiping in one direction, not back and forth.
Review dosing calculations regularly and use tool-assisted checks to keep quality control consistent.
When should we revise our peptide visit checklist?
Update your peptide visit checklist whenever clinical protocols, prescribing patterns, or patient needs change. Regular audits help catch and correct technique drift, including staff shortcuts and bad habits. Routine reviews keep the checklist in line with current safety standards, accurate calculations, and proper storage and disposal instructions.
PeptidePrescriber provides clinical resources and tools to help maintain these standards and update workflows.